Does your site have a sizable amount of content?
(Like a blog with more than just a few posts?)
Do you want to help visitors find content of interest to them, so they stick around your site for longer?
Then you likely need some kind of search facility.
One such option is to install Google’s search engine directly on your website.
This comprehensive step-by-step guide shows you exactly how to add Google Search to your website, along with:
- The pros and cons involved
- The range of customization options available
Let's take a look...
What Are the Pros and Cons of Adding Google Search?
On the plus side:
- It’s completely free—you get a customizable, sophisticated search engine on your website without having to pay a cent.
- It helps you understand what users are looking for—by linking with Google Analytics, you can see user search queries, which can feed into your content planning and help with creating a content calendar.
- It can generate revenue—create a separate income stream from visitors clicking on ads when using search, by linking your search engine with Google AdSense.
- You can add a promotion to the top of the search results in order to say highlight a particular product or service. More on how to do this below.
On the other hand:
- The free version is ad-supported—you can generate revenue from users clicking on those ads, but that can potentially mean visitors heading to competing sites and away from yours (though, as we’ll find out, you can block ads for specific URLs). Whether this works for you or not depends on your business model.
- It’s controlled by Google—it has various customization options, as described below, but ultimately it’s under Google’s control, and other search options (including WordPress’s built-in search functionality for example) give you a lot more control.
You can also choose to disable advertising by instead paying for the search queries conducted on your site, which can be limited by daily quota—we’ll see how to do this later.
So how you approach adding Google Search to your website needs careful consideration, based on your business model and what your aims are.
Ready to get started?
Here’s how to add Google Search to your website…
Add Search to Your Website with Google’s ‘Programmable Search Engine’
What is the Programmable Search Engine?
Google’s ‘Programmable Search Engine’ is effectively what you use to add a custom version of Google Search to your own website.
We’ll look at how to use it to add search to your site, and what you can customize, including what Google includes in its search results.
Google's 'Programmable Search' is one of the easiest ways to add search functionality to your website. You can customize it in multiple ways as required.Click To Post OnCreating Your Search Engine
First, head to Google’s Programmable Search site.
Click to create your first search engine.
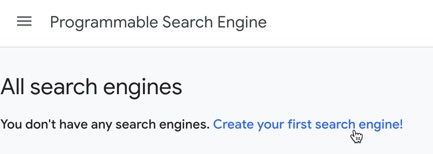
Set the following options:
- Give your search engine a name:
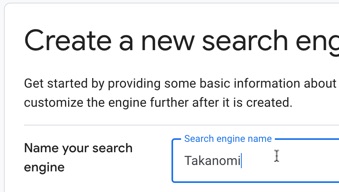
- Tell Google which site(s) you want to be included in the search results. You can add an entire site (e.g. www.everywheremarketer.com/ * ), add only part of your site (e.g. www.everywheremarketer.com/blog/ * ), add individual pages, and other options. Alternatively, you can opt for it to bring back results from the entire web.
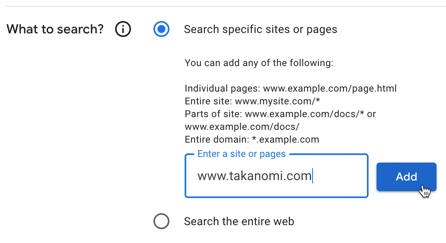
- Decide whether you want to enable Image search or SafeSearch.

- Click the Create button.
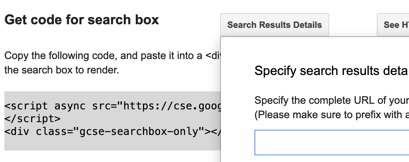
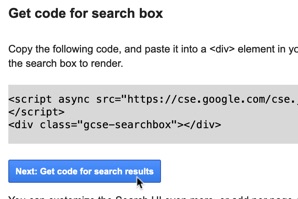
You’re then given some code to copy and paste onto your website, where you want the search box and results to be shown.
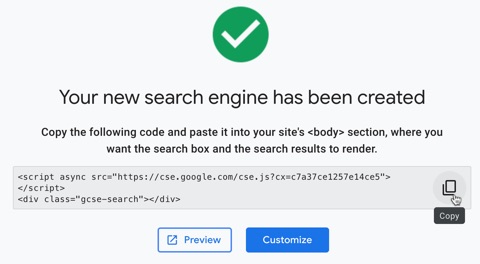
For example, without customizing it further, it would appear like this:

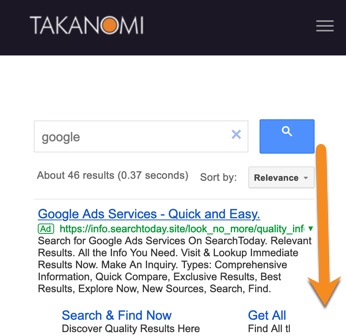
And when someone uses it to search, the results show via a popup (or overlay) on top of the existing page—we’ll see how to customize this shortly:
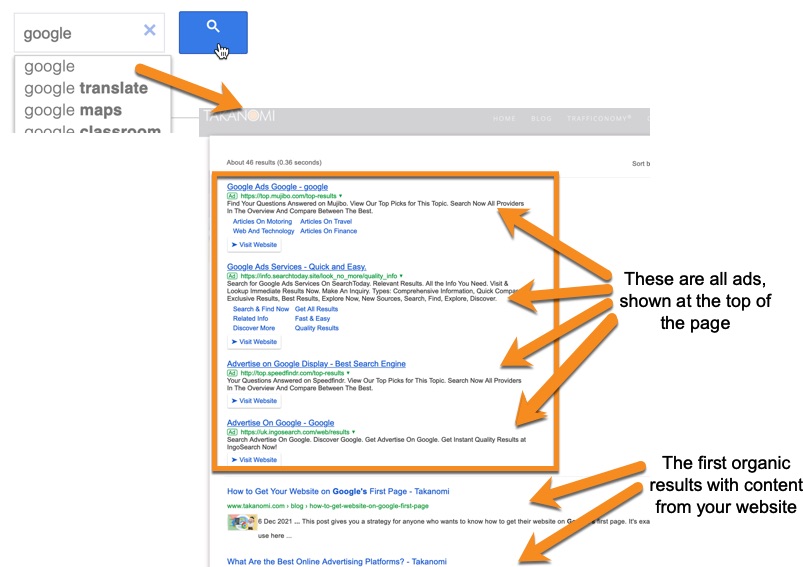
However, note how predominant the ads are in the search results. While the full screen isn’t shown above, they take up more than half of it.
This is fine if your aim is to earn revenue through Google AdSense, but if you’re aiming to keep people on your website and help them navigate to additional content of interest, it may prove less effective than other search solutions and you risk losing visitors to competitors.
Customizing Google Search on Your Website
Click the Customize button that’s shown just beneath the code snippet on Google.
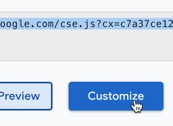
This allows you to adjust some of the options set previously, such as the name of your search engine and the sites to include in the search results.
But then you also get some additional options.
Region
This is only really relevant if you have selected the option to Search the entire web and means you can give preference or restrict the results to a specific region only.
Otherwise, leave as the default All regions option.

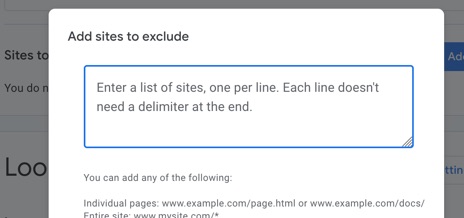
Exclude Sites
Again, only relevant if you’ve selected the Search the entire web option, you can choose to exclude specific sites from the results shown.
Look and Feel
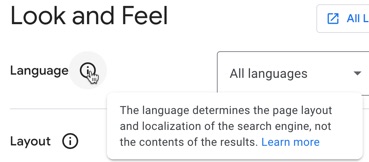
First, adjust the language if needed. Note however this only “determines the page layout and localization of the search engine”, rather than “the contents of the results”.
Then you can adjust the layout and theme. To do so, click the button provided:
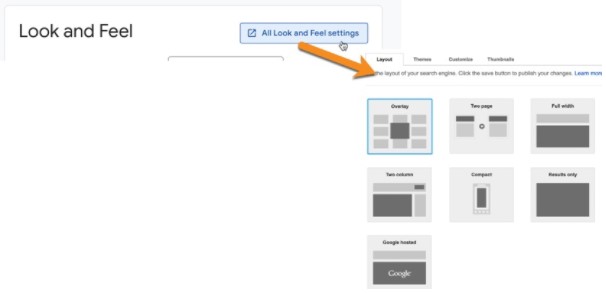
Layout
The layout options include the following:
- Overlay—the default layout, as shown above.
- Two page—you can specify a separate page on which you want the search results to appear.
- Full width—this effectively pushes existing content on the page downwards in order to show the results.
- Two column—with this layout option, you get two sets of code, one to put where you want the search box to show, and one for where you want the search results to be displayed.
- Compact—displays the search box and accompanying results in a compact format.
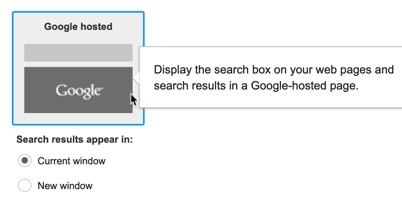
- Google hosted—displays just the search box on your website, with results displayed on Google (redirecting away from your website) rather than within your own site.
Themes
Google provides a few different themes for your search engine, which provide preset options for different fonts, background colors and border colors. You can also adjust these options individually along with other customizations which we’ll look at shortly.
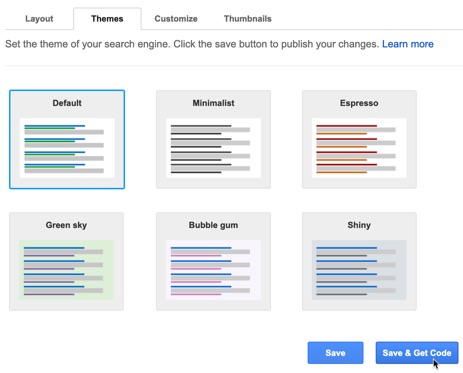
The default option looks very like Google’s usual search engine results pages, whereas the others use different fonts and color palettes:
- Minimalist—a simple color palette.
- Espresso—uses the Georgia font, with a warm color palette.
- Green sky—uses the Trebuchet font.
- Bubble gum—uses Arial.
- Shiny—uses Verdana along with a cool color palette.
An example of what each of these themes looks like is as follows (ads have been removed for ease of display):
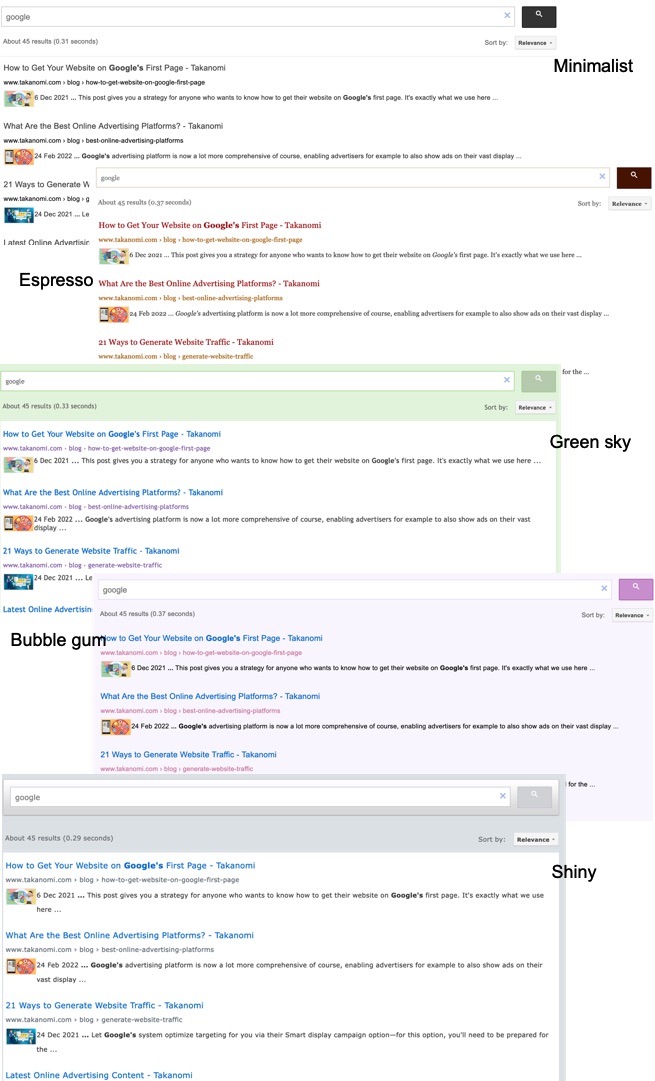
These are just preset options, so let’s see how to individually choose fonts, colors, and other aspects of how the search engine is displayed to suit your requirements.
Other Customization Options
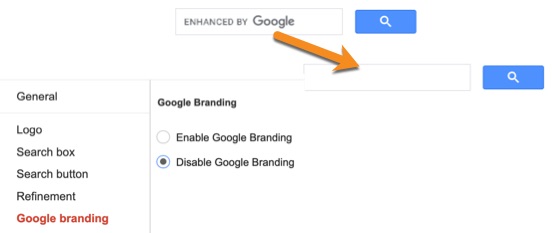
Clicking the Customize tab gives you a range of options with which to customize your search engine, including:
- The font
- The background and border colors
- The ability to add your logo (only used when choosing the Google hosted layout option)
- The search box border color, and button colors
- The ability to disable Google branding
Customizing Autocomplete Settings
Autocomplete is where a dropdown shows beneath the search box, suggesting potential queries based on what the user is typing.
You can choose whether to enable this or not on your search engine, and even add (or exclude) your own autocomplete queries.
To do so, click through to All Search Features settings, and then click on the Autocomplete tab.

Use the switches provided to:
- Turn autocomplete on or off
- Include autocomplete suggestions based on other sites around the web—if your search engine is restricted to your own website only, you may wish to turn this off.

To add your own custom autocompletions—reflecting queries you’d like to encourage users to search for—use the Custom Autocompletions section.
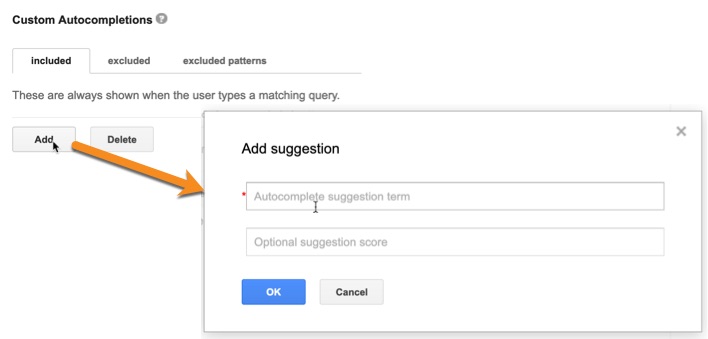
For each suggestion, add in the term you’d like to show, along with an optional score between 1 and 10,000.
This effectively gives you a way to prioritize certain suggestions above others, as suggestions with higher scores are shown before those with lower scores.
You can add up to 20,000 such suggestions. For high volume, it can be easier to upload an XML file in Google’s required format, which also allows you to layer in promotions that you want to show for certain autocomplete queries.
As well as adding autocompletions, you can also exclude queries that you don’t want to be shown as suggestions, whether by entering in terms directly or, for the more technically aware, by using regular expressions.
Want a customized version of Google Search for your website? Try their 'Programmable Search', customizing the layout, theme, ad options, autocomplete settings, and more.Click To Post OnUsing Synonyms to Help Users Find Results
Users will often search using queries that don’t exactly match words in your content, but where that content is still relevant and you’d like it to appear.
To help users find relevant content in this way, you can add up to 2,000 synonyms to your search engine.
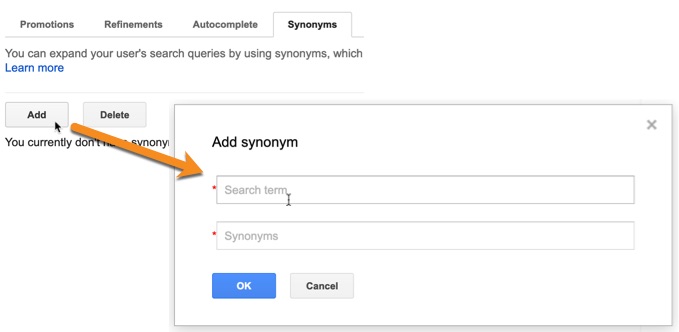
For each one, enter the:
- Search term.
- One or more synonyms, separated by commas.
As with the autocomplete suggestions above, you can also upload this information via a suitably-formatted XML file.
How to Add Your Own Promotion to the Top of Search
Let’s say you want to highlight a particular product or service to users when they search for specific keywords.
Google lets you do this via promotions, which shows a link at the top of the search results on your website, a bit like a text ad.
In fact, you can:
- Add different promotions for different sets of potential keyword searches.
- Specify start and end dates for when you want them to run.
Get started by clicking through to the search features settings, as illustrated previously.
Click the switch to enable promotions, and then click the Add button to add your first one.
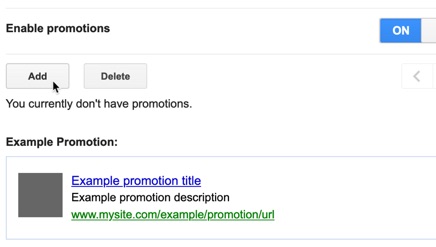
Fill in the fields provided, and described as follows, to create your promotion.
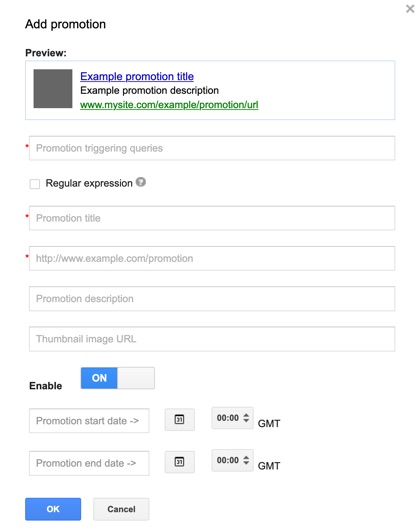
- Promotion triggering queries—enter up to 100 comma-separated queries. Advanced users can also use a regular expression in the field.
- Promotion title—the linked title shown at the top of the promotion.
- Promotion URL—where you want it to link to.
- Promotion description—up to 200 characters of text.
- Thumbnail image URL—optionally add a GIF, JPEG or PNG image to be shown to the left of the promotion, resized to 60x60.
Promotions can be turned on or off as required, and even a start and end date provided.
How to Make Money From Your Search Engine Through AdSense
In order to generate a revenue from Google through the ads shown in the search results on your website, you’ll need to connect your search engine with Google AdSense.
To do so, click on the Go to Ads Settings button.

If you’re not already signed up with Google AdSense, click the link provided. Once signed up, you’ll then be able to turned on the Search Engine Monetization option.

How to Block Ads from Competitors
Once your search engine is hooked up with AdSense, you can use features within AdSense to block ads for specific URLs.
In other words, you can completely block competing sites from showing ads on your website.
To do so, go to Blocking controls from within AdSense.
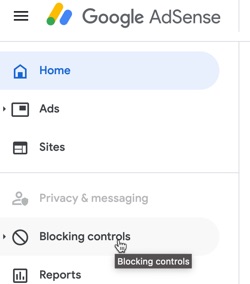
With Content selected, click the website where you’ve added Google Search.

Then simply enter in the URLs you want to block, and you should stop seeing ads from those URLs appearing on your search engine results within 24 hours.
But what if you want to go one step further and disable ads completely?...
How to Disable Advertising in the Search Results
In order to focus purely on selling your own products and services, rather than generating revenue through ads, consider disabling the ads shown in the search results on your site.
If you've added Google's custom search engine, Programmable Search, to your website, you can disable advertising by using their Programmable Search Element Paid API.Click To Post OnThis involves using Google’s Programmable Search Element Paid API, which charges (at the time of writing) USD$5 per 1000 ‘ad-free search element queries’.
Click the button they provide to get a Key.

Then enter that key into the settings for your search engine, via the Ads tab.

Link Google Search with Google Analytics
Google provides some stats within the Programmable Search Engine console.
This shows you popular queries, viewable by day, week, month, year or lifetime, along with other data about search usage, including the number of searches performed.
By linking your search engine with Google Analytics, you are provided with more detailed information via Site Search reports, including:
- Search usage—find out what users have searched for, whether those searches were refined, and where they went as a result.
- Trending terms—see the most popular search terms used.
- Pages—discover which pages have attracted the most search usage.
To link with Google Analytics:
- Your Google Analytics account needs to be in the same Google account as your search engine.
- Make sure the Google Analytics code is also on your website.
- From the Statistics and Logs section of Programmable Search, click the Google Analytics tab and select the profile where you want the Site Search reports to appear.
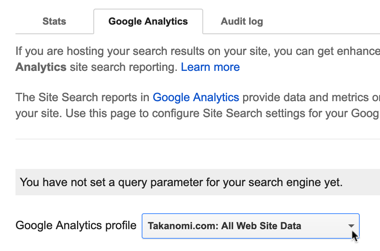
- You’ll then need to add one or more parameters to indicate the query parameters you want to use, such as ‘q’.
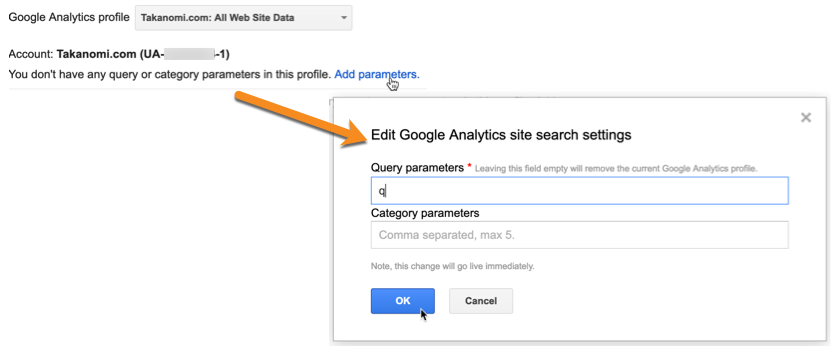
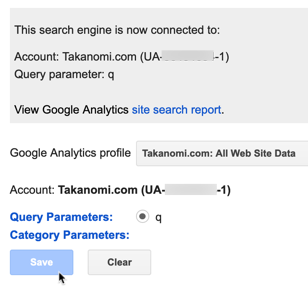
Note that after adding one or more parameters, you may need to select the profile again and then click Save for the information to be saved correctly.
Frequently Asked Questions
What are the pros and cons of adding Google Search to my website?
Pros include it's free, provides user insights, and can generate revenue, while cons involve ads and Google's control.
What is the Programmable Search Engine by Google?
Google's 'Programmable Search Engine' allows adding a custom Google Search to your website with various customization options.
How do I customize Google Search on my website?
Customize search layout, themes, autocomplete, synonyms, promotions, and ad settings through Google's 'Programmable Search'.
How can I disable advertising in the search results on my website?
Use Google's 'Programmable Search Element Paid API' to disable ads by paying for queries or use key to disable ads.
How do I link Google Search with Google Analytics for my website?
Link Google Search with Google Analytics to gain detailed insights like popular queries and pages by setting parameters in 'Programmable Search'.
To Conclude
Hopefully you’ve found our comprehensive guide on how to add Google Search to your website helpful.
As we’ve discovered, it’s simple to get started—by simply copying and pasting a few lines of code to your website—and there are a range of customization options to suit.
You can even choose to link up with AdSense to share revenue on clicks on ads within the search results, or choose to eliminate ads completely via their Paid API feature.


