Wondering how to add photos to an album on your Facebook Business Page using mobile?
This type of task might seem straightforward enough on a desktop computer.
But how do you approach it on a phone?
This short guide will help you.
1. Open the Facebook App

Start by opening Facebook’s app on your phone.
2. Open the Facebook Menu

From the bottom right of the screen, tap to open the menu.
3. Open Facebook Pages

Scroll down the list and tap on the Pages button.
4. Open Your Facebook Page

Open the Page with the album you want to add photos to.
5. Open the Photos Tab

Scroll down the Page and tap on the Photos tab.
6. Open the Relevant Album

Open the album you want to add photos to. You can also create a new album.
7. Tap to Add Photos

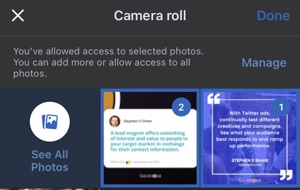
Tap the Add Photos button on your album. This will open your phone’s camera roll or similar.
8. Select the Photos to Add

Select one or more photos you want to add to your album, and tap Done.
Note this is how it looks on iOS. It may look a little different on Android.
9. Upload to Your Business Page

Confirm you want the photos added to your album by tapping the Upload button.
You can also add a comment if you wish.
10. Confirmation

As soon as the photos have been uploaded, you’ll see a confirmation message.
Note that adding photos to your Business Page album will also post a message to Page’s timeline.
Frequently Asked Questions
How do I add photos to a Facebook Business Page album using mobile?
Open the Facebook app, go to Pages, select your Page, open the Photos tab, choose the album, tap Add Photos, select photos, and upload.
How can I access my Facebook Business Page's album on mobile?
In the Facebook app, open the menu, navigate to Pages, select your Page, and then go to the Photos tab.
What happens after I upload photos to a Facebook Business Page album using mobile?
Once uploaded, you'll receive a confirmation message, and the photos will be posted to your Page's timeline.
To Conclude
So you now know exactly how to add photos to a Facebook Business Page using mobile.
As you can see, it’s a quick and easy process. Follow the steps above and it will soon become second nature.


