What if you could:
- Advertise on Google Search, but only to people who've already heard about you?
- Avoid advertising to people who've already bought?
- Bid differently for hot prospects?
If so, you need Remarketing Lists for Search Ads (RLSA).
Yes, that's a bit of a mouthful. So:
- What does it actually mean?
- Who should be using RLSAs?
- How do you put them into action for your search campaigns?
- What strategies should you employ to make them as effective as possible?
Let's find out...
What Are Remarketing Lists for Search Ads (RLSAs)?
Remarketing lists for search ads—or RLSA—is where advertisers can target search campaigns (in Google Ads) at people who have previously visited their website.
There are a couple of different approaches available:
- Targeting search ads only at people on a remarketing list— this means that someone would only see an ad if they are (a) searching for a keyword term you’re targeting; and (b) are also on a remarketing list attached to the campaign
- Targeting search ads in the usual way, but adjusting your bids for people on a relevant remarketing list—so this allows you to bid more for example for ads shown to people who have previously visited your site and who are searching for a targeted keyword
Who Should Be Using RLSAs?
Essentially, anyone running search campaigns on Google should consider using RLSA in order to better reach people who are both using Google Search and who already have some familiarity with their website.
Doing so provides for advanced targeting that can improve campaign performance.
By using remarketing lists for your search ads, you can set different bids for ads shown to people who already know about you.Click To Post OnHowever, note that you do need at least 1,000 people on a remarketing list before you can use it for your search ads—so the sooner you start collecting the data you need, the better!
Full details on how to do so are below.
What are Some of the Best Ways to Use Remarketing Lists for Search Ads (RLSAs)?
Advertise Only to Your Remarketing Lists
If you’re in the early stages of growing a business, you may not have the budget for fully fledged search campaigns on Google.
A top way to stretch a limited ad budget as far as possible is to only advertise to people who have already visited your website.
After all, they already know something about you, and if clicking through again, are more likely to convert.
Adjust Your Bidding for RLSA Audiences
As you’ll see below, Google gives you the option to show search ads to users in the normal way, but to adjust bidding for people in your RLSA audiences.
At a basic level, this might simply mean increasing the bid for people who have previously visited your site or had some kind of interaction, because the chances of converting them are higher.
But it’s all worth testing. You might find it’s actually more worthwhile to decrease your bids for your RLSA audiences because they’ve already visited your site and are more likely to click on your ad anyway, despite the lower bid.
Your bidding strategy can get pretty sophisticated.
For example, if you run an ecommerce site, you may have created audiences for:
- People who have been browsing
- People who have added items to their shopping cart but didn’t start the checkout process
- People who started to checkout but didn’t complete their purchase
These audiences increase in value each time, so your bidding can reflect that, bidding more as appropriate to entice them to return and finish their shopping.
One way to use remarketing lists for search ads is to set up specific campaigns to target people who've previously visited your website.Click To Post OnExclude Remarketing Lists
How many times have you googled a company you’re already a customer of, and click the ad rather than the result just below in the organic listings?
Personally, I do this all the time.
But for the advertiser, that’s not just wasted ad spend, it also skews the results they get from advertising to new prospects.
So, one of the most effective ways to put RLSAs into action is to build a list that consists of your existing customers, and then exclude them from your search campaigns.
How to Put Remarketing Lists for Search Ads into Action
1. Ensure Your Website Is Compliant
The first step is to make sure you understand Google’s advertising policies and that your website is compliant and suitable for collecting data from visitors.
Key documents you should be familiar with include the following:
Before using remarketing, you also need to ensure your website’s privacy policy includes information about the following:
- How you’re using remarketing to advertise
- How Google’s showing your ads on websites, including its use of cookies and other identifiers
- How visitors can opt out
Full information about exactly what Google requires you to include can be found here.
2. Start Collecting Remarketing List Data
To start collecting data for your remarketing lists, you need to add some code called a ‘remarketing tag’ to your website.
This code essentially communicates with Google, providing them with details of whoever is on your page so that you’re able to reach them in future via advertising.
To add this to your website, start by signing into Google Ads, and then click through to the Audience Manager, via Tools and Settings on the top menu.
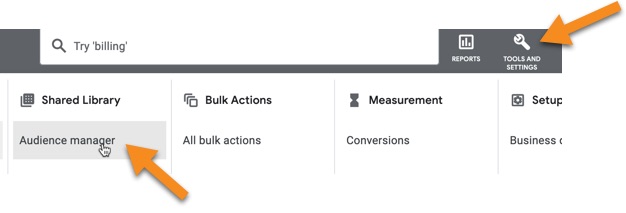
Click on Your data sources on the left-hand menu, and look for the Google Ads tag card.

Click on the Details button on the card, and look for a Tag setup section.

Follow the instructions to add the code to your website.
3. Create an Audience Segment of Website Visitors
From the left-hand menu of the Audience Manager, click Segments.
Add a new audience, by clicking the big plus ‘+’ button, and choose the Website visitors option.
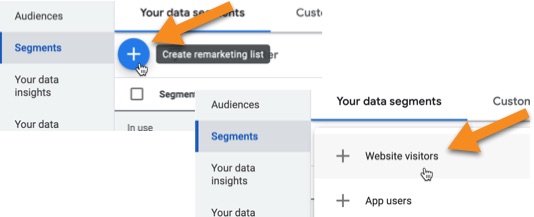
Name the segment for your future reference so you know exactly what the people in the segment have done on your website, e.g. visited a particular page.
Select one of the options in the Segment members section.
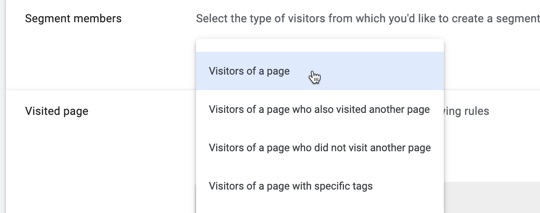
Select a rule type from the dropdown in the Visited page section, and then fill in the rules to match what you’re looking for.

Let’s say you want an audience segment of people who have visited a thank you page on your website for an offer to download something, and the end part of the URL is /download-thanks.
Your rule might therefore look something like this:

However, note that this rule would also include anyone visiting URLs like the following as well (presuming these also existed on your website):
- /download-thanks-2
- /download-thanks-special
You can adjust the rule and/or add additional rules so it matches exactly what you’re looking for.
In the Pre-fill options section, you can choose to:
- Pre-fill the segment with people who have already matched your rules over the past 30 days; or
- Start with an empty segment so that you build completely fresh data.
By default, people will stay in your segment for you to advertise to for 30 days. This can be adjusted up to 540 days (around 18 months) if required.
Finally, you can add an optional description to help you identify who is in the audience segment in future.
Once happy with your segment settings, click Create segment.
Repeat for as many other segments as you want to create.
4. Using Your Remarketing Lists (Audience Segments) for a Search Campaign
So now you’ve got your remarketing lists (i.e. the audience segments created above), how do you then use them for your ads on Google Search?
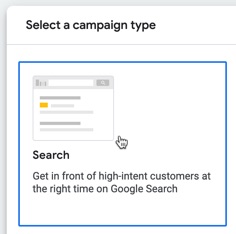
When setting up your campaign, in the Campaign settings section, look for the Audience segments area.
From here, you can choose one or more of your segments to either target, or to ‘observe’, depending on which option you select at the bottom of the panel.
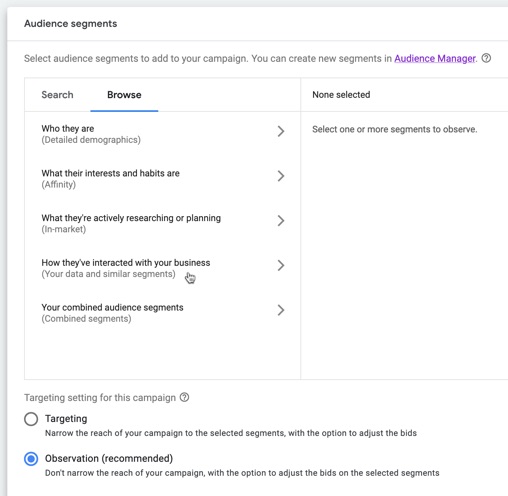
By targeting your selected segments, your ads will only show to audiences in those segments.
Alternatively, the default Observation setting means your ads will target other people as they normally would, but you can adjust the bids for reaching people in your segments. For example, they may be easier to convert, so placing higher bids may provide for a higher return.
You need at least 1,000 people on a remarketing list before you can use it to help improve performance of your search ads.Click To Post OnFrequently Asked Questions
What does Remarketing Lists for Search Ads (RLSAs) mean?
Remarketing lists for search ads allow advertisers to target search campaigns at people who have previously visited their website.
Who should be using Remarketing Lists for Search Ads (RLSAs)?
Anyone running search campaigns on Google should consider using RLSA to better reach people familiar with their website for improved campaign performance.
How do you put Remarketing Lists for Search Ads (RLSAs) into action for your search campaigns?
To use RLSAs, ensure website compliance, add remarketing tag code, create audience segments of website visitors, and select these segments when setting up search campaigns.
What strategies should you employ to make Remarketing Lists for Search Ads (RLSAs) as effective as possible?
Effective strategies include advertising only to remarketing lists, adjusting bidding for RLSA audiences, and excluding existing customers from search campaigns.
To Conclude
Remarketing lists for search ads (RLSAs) are a powerful tool, enabling you to directly target people on Google Search who’ve visited your site previously, whether via separate campaigns or by adjusting your bidding appropriately.
That can make your advertising on search a lot more effective by potentially increasing conversions and lowering your ad costs.
