Just publishing videos onto YouTube and hoping for the best isn't enough.
It's essential to also optimize your channel in order to get found and maximize results.
After all...
- 720,000 hours of video content are uploaded to YouTube every day,
- There are 114 million active YouTube channels.
That’s a lot of competition!
It means you need to do everything you can to help your own videos get found!
That includes optimizing your channel.
This post shows you what YouTube channel optimization involves and how to approach it.
Let’s look at the strategies you need to be putting into action today…
10 Top YouTube Channel Optimization Strategies
1. Use Keywords in Video Titles and Descriptions
With all the competition now on YouTube, getting your own videos found requires effective optimization of your YouTube channel.Click To Post OnOptimizing to get your videos found on YouTube is not that different to optimizing to get other content like blog posts found on Google.
It’s all about keywords.
Ideally, this starts before you create your next video.
Do keyword research to determine what people in your niche are searching for and create a video on the topic.
This can start with something as basic as using YouTube’s search suggestions that appear when you use YouTube’s search facility. These help indicate some of the most common queries related to what you’re typing in.

Then use those keywords in the title and description of your video when you upload it to YouTube.
In addition, using the keyword in the name of the video file itself is also commonly recommended as an effective YouTube SEO technique.
So if your keyword is how to make apple pie, name the video file something like how-to-make-apple-pie.mp4.
There’s no official confirmation that the file name has any actual effect, and not much in the way of actual evidence.
But it makes sense that it might have some impact in terms of informing YouTube what the video is about, so why take chances?
Optimizing to get your videos found on YouTube isn't that different to optimizing other content to get found on Google. It's all about using keywords effectively.Click To Post On2. Use the Keyword in the Audio on the Video
Regardless of what you put in the title and description for the video, YouTube will also make its own judgment on what your video is actually about by ‘listening’ to the video.
In practice, this means it processes the video, creating a transcription file based on the audio content using technology similar to that used for Google Assistant to process what someone is saying.
This transcription is used for its automatic captions, but is also used of course to determine what your video is about so YouTube can then rank it appropriately.
This means that your keyword must also appear multiple times (depending on the length of your video) in what whoever is in the video is actually saying.
Think about how you would approach optimizing a blog post for a keyword. You’d likely have the keyword in the opening paragraph, towards the end of the post (maybe in the last paragraph or two), and a few places in between, depending on the length of the post.
Ideally, you’d keep it natural, mix it up a bit, and use a few variations of that keyword—and avoid anything that looks like keyword stuffing, or that looks like you’re prioritizing creating content for search engines over creating something that offers real value to real human beings.
It’s the same for your videos. Imagine a script for your video (whether or not you use one in practice), and it should look like you took a very similar approach.
3. Use a Video Transcription for the Description
We’ve already mentioned using keywords in your description.
And in (2) above we talked about using keywords in your video’s audio.
The fact is that, when approached correctly, a transcription for your video is likely to contain not just the keyword you want to focus on, but lots of related keywords that you’ve probably not even thought of, but that people are searching for.
So when you use the transcription as the description for your video, it multiplies the chances of your video showing up for all kinds of different searches on YouTube relating to your audience’s interests.
4. Link Timestamps to Key Moments
Particularly for longer videos, people often don’t want to watch the whole video just to get to the part they’re interested in.
It stands to reason therefore that allowing viewers to skip to the relevant section increases overall engagement.
To help attract viewers to longer videos on YouTube, link timestamps to key moments so viewers can get straight to the bit they're most interested in.Click To Post OnRealizing this, in 2019 Google introduced the ability for people to skip to “key moments” in videos with the addition of a timestamp to the URL.
Here’s how it works.
By adding a parameter to the end of the URL that looks like t=635, this tells YouTube the number of seconds to skip forward in the video.
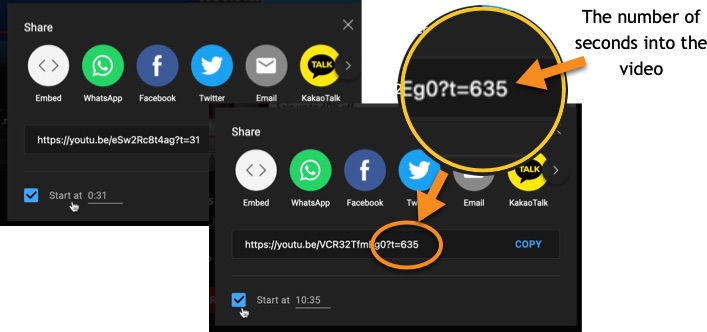
So in this example, t=635 means 10 minutes and 35 seconds.
When you click to share a video that you’re watching, you can check a checkbox that will add this timestamp information to the share link automatically.
Or to do it manually:
- If there’s no question mark already in the link somewhere, add a question mark at the end, and then add the timestamp information. So a link like https://youtu.be/eSw2Rc8t4ag would look like https://youtu.be/eSw2Rc8t4ag?t=33, adding ?t=33 to the end in order to skip to the 33 second point in the video
- If there’s already a question mark in the link, such as https://www.youtube.com/watch?v=eSw2Rc8t4ag, add an ampersand ‘&’ character at the end instead before you then add the timestamp information. So the link would look something like https://www.youtube.com/watch?v=eSw2Rc8t4ag&t=33 (with the addition of &t=33 at the end)
However, while this helps when you want to link to a specific part of a video from your website or elsewhere, you don’t need to worry about this in order to get timestamps to show up in Google’s search results.
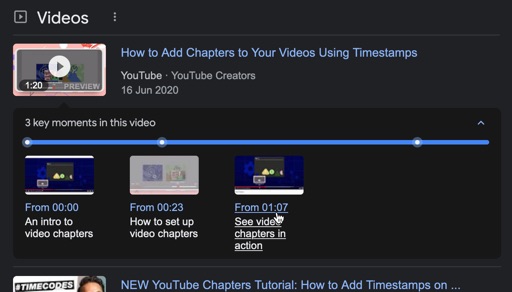
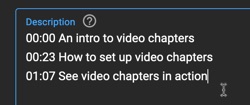
Instead, all you need to do is list out the timestamps somewhere within your description when uploading your video to YouTube, so they look like this:
00:00 An intro to video chapters 00:23 How to set up video chapters 01:07 See video chapters in action
5. Use “Stand Out” Video Thumbnails
One of the key deciding factors for whether or not someone watches your video is your video thumbnail.
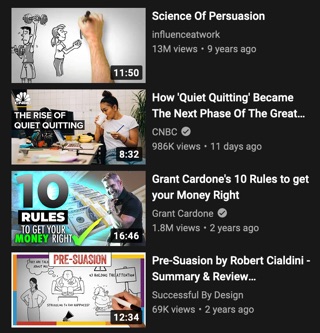
It works the same way with Facebook advertising where a change in the image used in your ad can dramatically improve the percentage of people clicking on the ad.
Your custom video thumbnail, whether shown on YouTube or in Google’s search results, is essentially the ‘ad’ for your video. You want it to stand out and attract the attention of your intended audience.
Start paying attention to why you click on certain video thumbnails and not others. Look at the techniques used by some of the top channels in your niche, and think about how you can improve your own.
6. Use Cards to Grow Subscribers and Promote Videos
YouTube’s info cards are shown in the top right corner of videos, like in this example
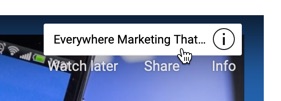
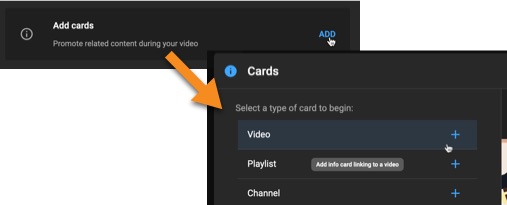
You can add up to 5 cards to your video to help promote your other videos, a playlist, or your channel to encourage viewers to subscribe.
Cards can be added when uploading your video, or you can add and edit them later.
7. Use Relevant Tags and Hashtags
Tags and hashtags on YouTube work in different ways.
Tags are what you add into the Tags field when uploading (or editing) a video and, while useful, have a relatively minimal impact on the discoverability of your video.
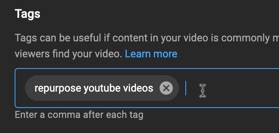
On the other hand, hashtags are shown above the title of your video on YouTube and work like hashtags on other social media platforms.
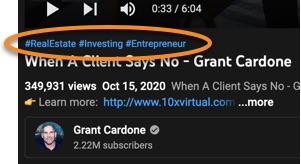
Clicking on the hashtag allows viewers to quickly find other related videos, so it can have more of an impact on your ability to attract viewers.
To add hashtags to your own videos, include them at the very end of your video’s description.
YouTube will then display a maximum of three of them above your video, as in the example above.
For the best chances of discoverability, use the most relevant, specific hashtags you can. These will generally have lower levels of competition than the broader, more popular hashtags, making it easier for your own content to get found.
8. Use Playlists to Organize Your Channel
One of the top ways to optimize your YouTube channel is to organize your videos into playlists, so that visitors to your channel’s page can find what they want easily, and so that you can also potentially link to a grouping of related videos on a particular topic.
Playlists work in a similar way to categories on a blog, enabling you to group related content together.

You can also move playlists around so they’re ordered in an optimal way for your channel.
9. Use End Screens to Grow Subscribers and Promote Videos
End screens are of course what can be shown dynamically at the end of your video as an overlay to your video content, and encourage viewers to watch other videos on your channel and to subscribe.
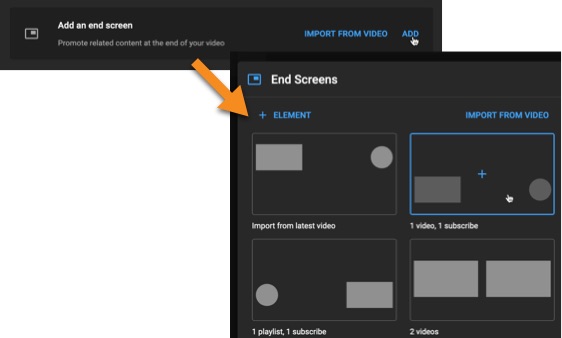
Adding an end screen only takes a second or two, with different templates available to choose from.
If you choose not to use an end screen, then YouTube will likely recommend videos from other channels, taking viewers away from your own.
By adding an end screen, you instead get to control what’s shown, making it a vital part of optimizing your channel.
10. Regularly and Consistently Post New Videos!
The more videos you’ve published to your channel related to your niche…
- The more visibility you get on YouTube…
- And the more chances you have of turning up in front of the audience you want to attract.
You won’t grow by sporadically posting new videos based on whether or not you “feel like it”.
Systematize it. Create a content calendar where you’re posting new videos regularly and stick to it.
If you’re regularly publishing content elsewhere, such as on a blog, repurpose them into videos, using Trafficonomy to systematize it so it just happens like clockwork and others on your team are held accountable for taking care of it.
Frequently Asked Questions
How can I optimize my YouTube channel?
Optimize your YouTube channel by using keywords in video titles and descriptions, the video's audio, and a video transcription.
How do I link timestamps to key moments in my YouTube video?
To link timestamps to key moments, add a parameter like 't=635' to the video URL to skip forward in seconds, or list timestamps in the video description.
Why are 'stand out' video thumbnails important for YouTube channel optimization?
Eye-catching video thumbnails are crucial as they act as an 'ad' for your video, attracting viewers and increasing click-through rates.
To Conclude
As we’ve seen, effective YouTube channel optimization is largely about optimizing the videos themselves so that each video you publish has the maximum chance to get found by your prospective audience.
In doing so, you’ll naturally attract more subscribers to your channel and more views for future videos you publish.
