Have you ever wondered where your website visitors go when they click on outbound links?
If you're not tracking these external clicks, you're missing valuable insights into what drives your audience off-site.
Each outbound link clicked on your page is a potential clue about your visitors' interests, helping you understand what resources, partners, or recommendations resonate with them most.
Tracking outbound links reveals where your visitors go after leaving your site, offering insights into their interests and behaviorsClick To Post OnThis knowledge can be a game-changer, whether you’re refining your content strategy, evaluating the success of affiliate programs, or measuring the impact of external marketing campaigns.
But here's the problem: without proper tracking, these outbound interactions are invisible, leaving you in the dark about the full journey of your users.
The good news?
Google Tag Manager (GTM) offers a powerful, user-friendly way to set up tracking for outbound links, letting you capture and analyze this critical data without the need for constant code changes.
In this post, we'll dive into how you can put Google Tag Manager into action to track outbound links, gain actionable insights into user behavior, and elevate your content strategy.
Let’s get started...
Why Tracking Outbound Links is Important
Tracking outbound links can reveal powerful insights about your audience's interests and help you refine your online strategies.
Here are the core reasons why tracking outbound links should be a key part of your analytics setup.
1. Understand Visitor Behavior
When you track outbound links, you’re capturing a critical piece of your audience’s journey.
Each time a visitor clicks a link that leads off your site, it tells you something about their preferences and what they value beyond your content.
Are they diving into specific resources?
Checking out recommended products?
This behavior can indicate what topics or recommendations are most engaging to them, guiding your content creation and helping you provide more of what your audience wants.
2. Measure External Campaign Success
If you’re running external marketing campaigns, like content partnerships or sponsored posts, tracking outbound links gives you concrete metrics on their effectiveness.
Knowing exactly how much traffic you’re driving to an affiliate or partner site helps you assess the success of these campaigns and justifies your ROI.
This kind of data can also be a valuable tool when negotiating future partnerships, as it demonstrates the tangible value you bring to the table.
Google Tag Manager enables efficient tracking of outbound links without the need for constant code changesClick To Post On3. Optimize Affiliate and Partnership Programs
For sites that rely on affiliate marketing or partnerships, outbound link tracking is a must.
By monitoring which links get the most attention, you can assess which partnerships or affiliate products are performing best and focus on those that yield the highest engagement.
This allows you to fine-tune your strategy, strengthen the relationships that bring you the most value, and ultimately maximize your affiliate revenue potential.
4. Identify Points of Exit in the Conversion Funnel
Sometimes, visitors leave your site by clicking outbound links too early in their journey, such as before they’ve made a purchase or completed a form.
By tracking these exit points, you can pinpoint if users are navigating away at critical moments in your funnel.
With this insight, you can make adjustments—like optimizing calls-to-action, simplifying checkout flows, or highlighting additional incentives to keep visitors engaged and moving toward conversion.
5. Improve Your SEO and Content Strategy
Tracking outbound links can even provide valuable insights for SEO.
By identifying which external sites and resources your audience gravitates toward, you can adapt your SEO and content strategies accordingly.
For example, if your users frequently click on links to certain industry publications or high-authority sites, you might consider collaborating with these sites or linking to similar authoritative sources to build your credibility and potentially improve your site’s rankings.
Monitoring outbound link clicks evaluates the effectiveness of affiliate partnerships and external campaigns, informing strategic decisionsClick To Post On
In brief, by tracking outbound links with Google Tag Manager, you open the door to a wealth of data that enhances your understanding of your audience and helps you make smarter decisions about your content, partnerships, and conversion strategies.
Setting Up Google Tag Manager
To start tracking outbound links, the first step is to set up Google Tag Manager (GTM).
GTM is a powerful tool that lets you add and manage tracking tags on your website—all without needing to dive into your site’s code each time.
Here’s how to get it up and running so you can capture critical outbound link data.
Step 1: Create a Google Tag Manager Account
-
Go to Google Tag Manager: Head over to tagmanager.google.com and sign in using your Google account. If you don’t have one, you’ll need to create it.
-
Create a New Account. Once signed in, click on Create Account.

Fill in your account name, typically your business name, and select your country.
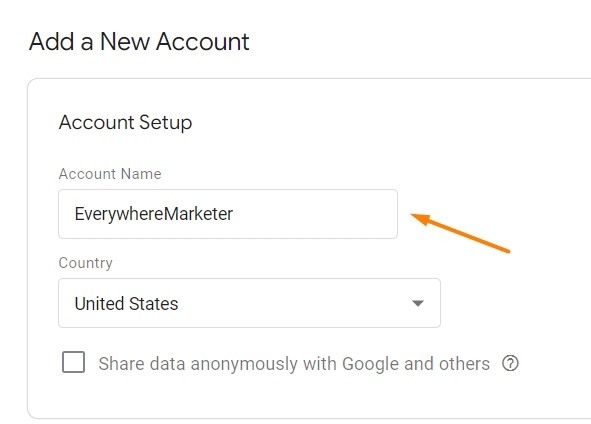
- Set Up Your Container: Next, you’ll be asked to set up a container, which is where all your tracking tags will live. Enter your website domain for easy identification…
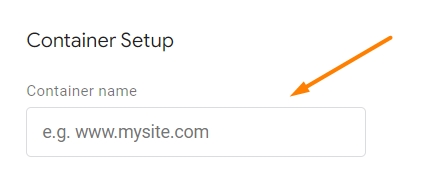
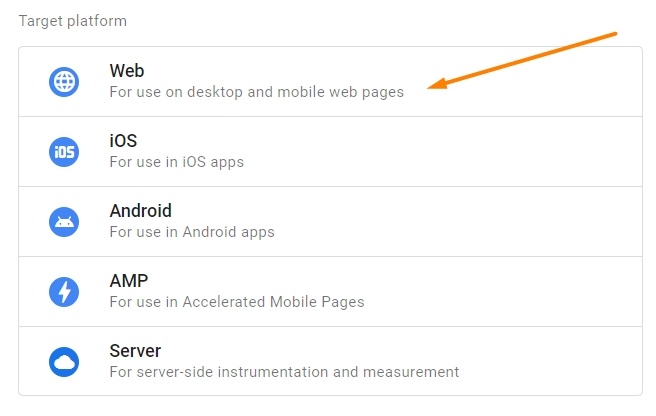
… and select Web as the container type. Then, click Create.
Step 2: Install GTM on Your Website
To start tracking, you’ll need to install GTM’s code snippets on your site.
-
Get the Code Snippets: After setting up the container, Google Tag Manager will generate two code snippets—one for the
<head>and another for the<body>section of your website.
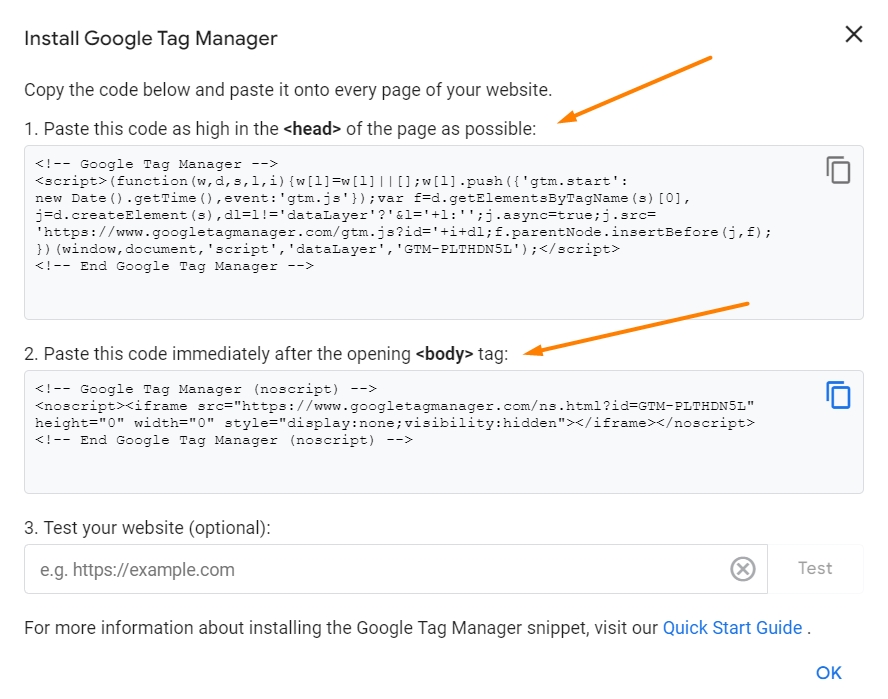
- Add the Code to Your Website:
-
For the
<head>section: Copy the first code snippet and paste it as close to the opening<head>tag as possible on every page of your website. -
For the
<body>section: Copy the second code snippet and paste it immediately after the opening<body>tag on each page.
- Save and Publish: Once you’ve added these snippets, save the changes in your website’s content management system (CMS) or site editor.
If you’re using a CMS like WordPress, look for GTM integration plugins that simplify this process by allowing you to add GTM codes directly through the plugin settings.
Step 3: Verify Your GTM Installation
To ensure that GTM is installed correctly:
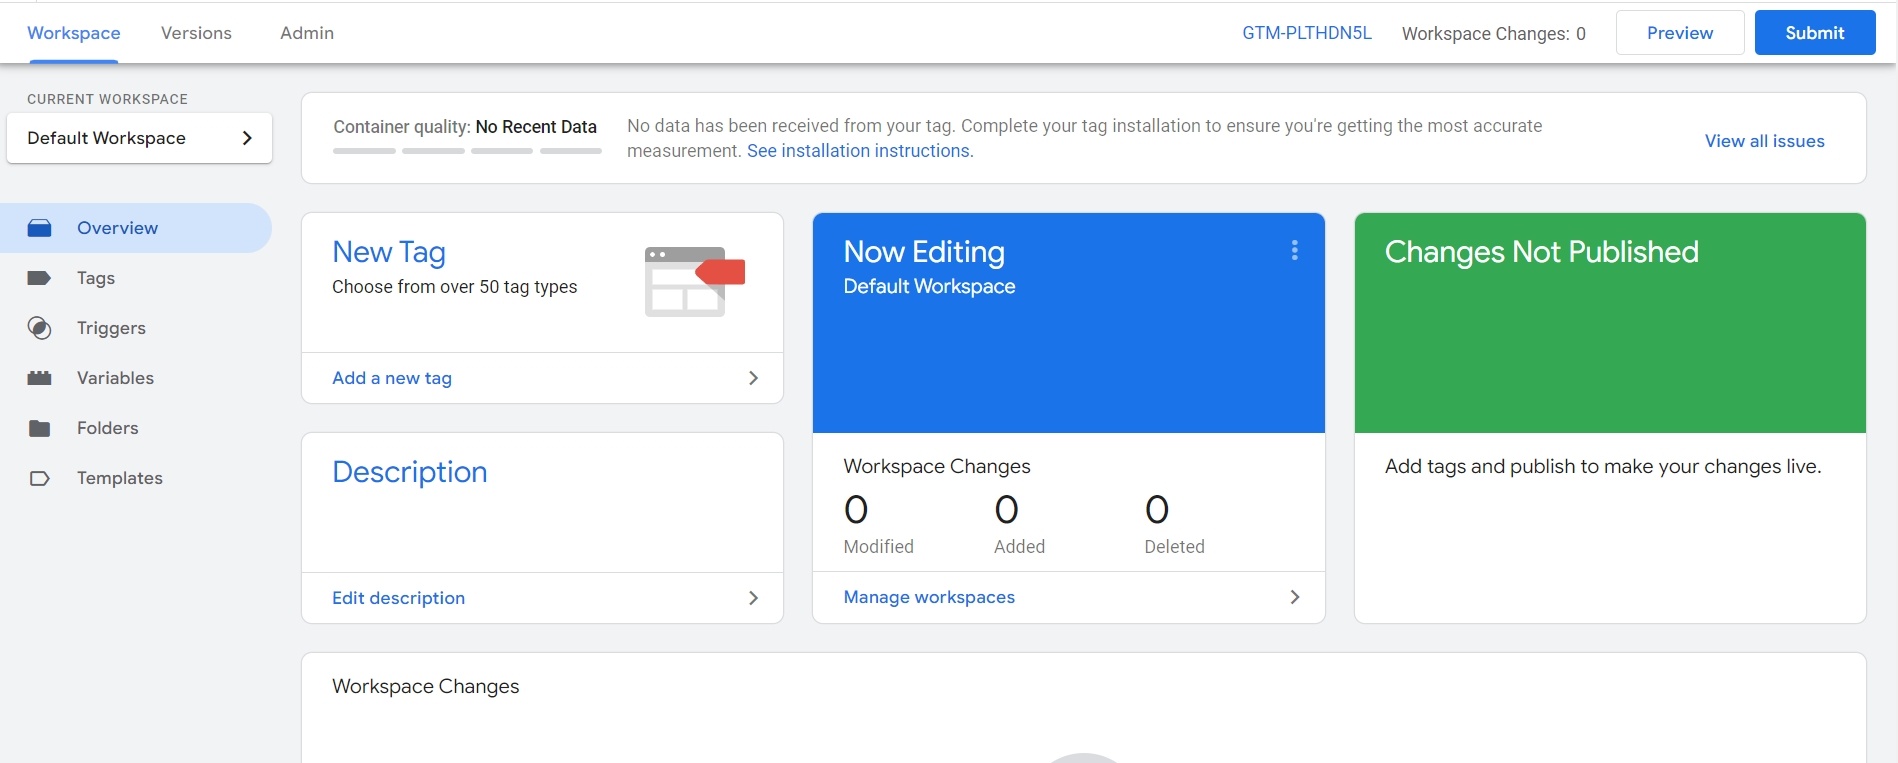
- Preview Mode: Go back to the GTM dashboard, click on Preview in the upper-right corner. This opens a debug console where you can test tags and triggers.

-
Visit Your Website: In a new browser tab, open your website (be sure it’s not cached). If GTM is set up correctly, a GTM debugging console should appear at the bottom of the page, showing which tags are firing.
-
Confirm Debug Console: If you see the debug console, GTM is successfully installed and ready for tag and trigger setup.
Step 4: Set Up Your First Tag (e.g., Google Analytics)
Now that GTM is installed, it’s time to create your first tag to start collecting data.
Many users begin by setting up Google Analytics, which allows you to track essential data on pageviews and user interactions.
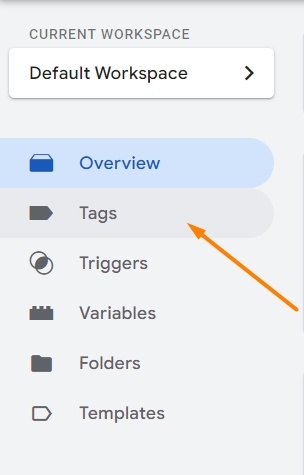
- Navigate to Tags: In your GTM dashboard, select Tags from the left menu, then click on New to create a new tag.

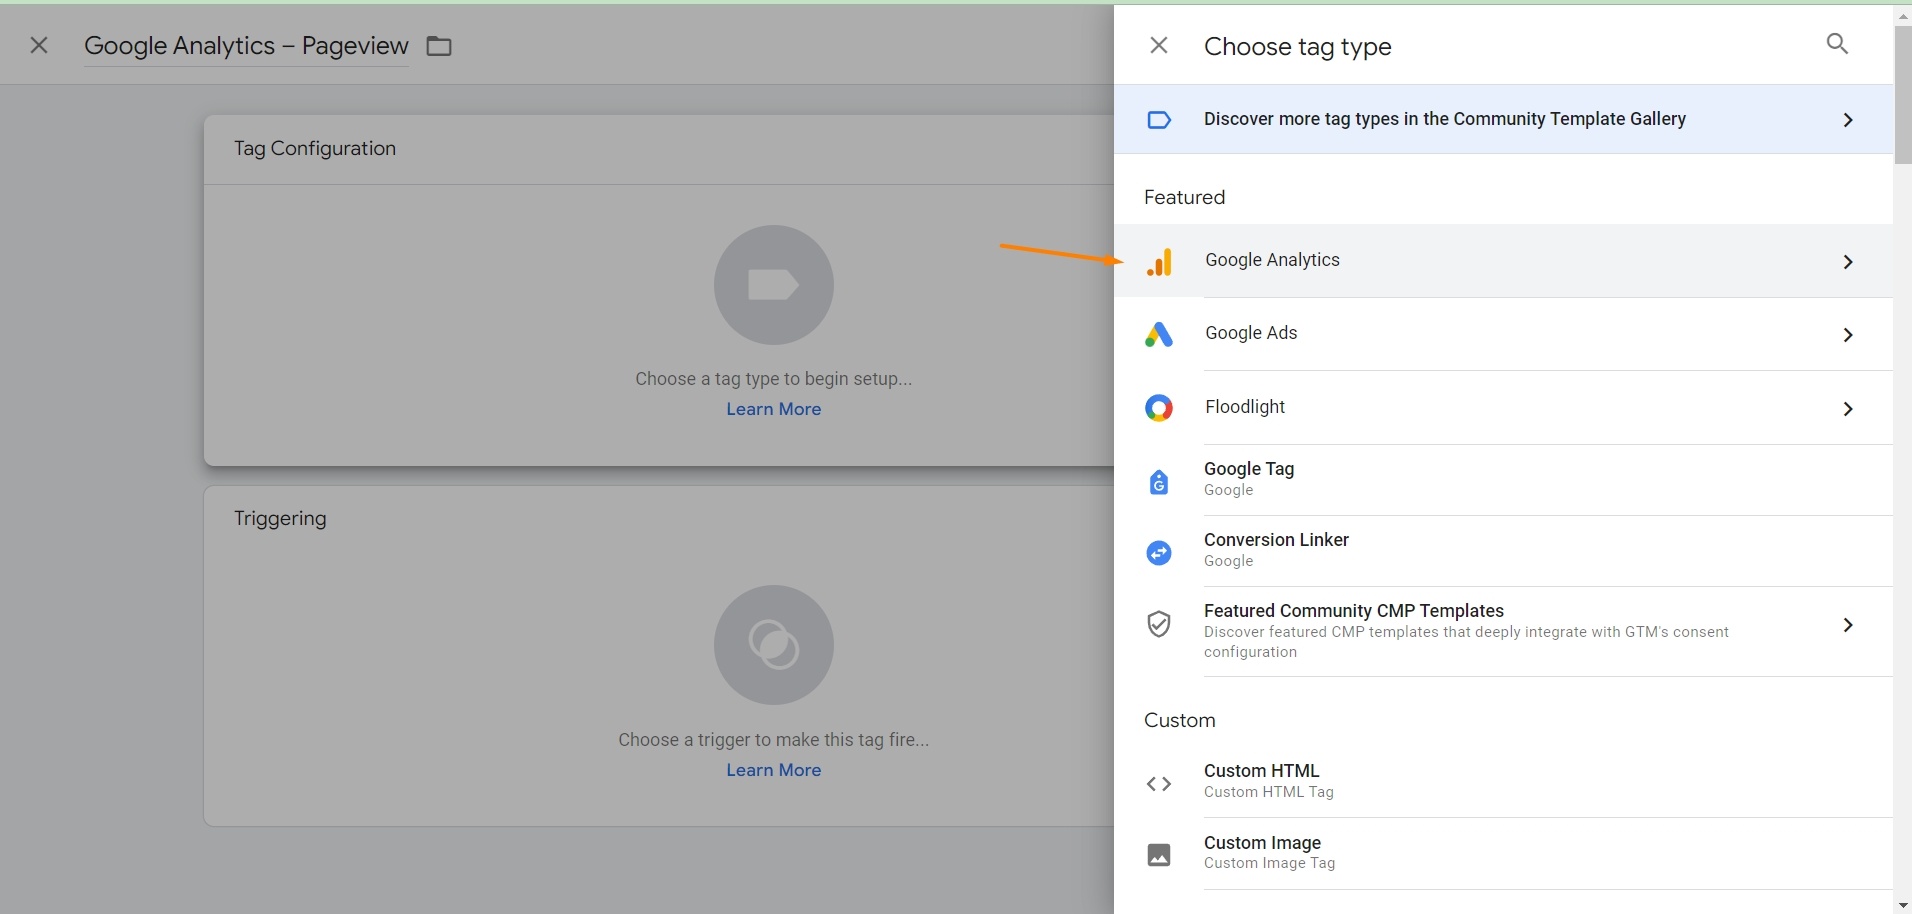
- Configure Tag Type:
- Click on Tag Configuration and select Google Analytics: GA4 Configuration (for Google Analytics 4).
- Enter your Measurement ID (found in your Google Analytics account). For Universal Analytics, input your Tracking ID (it looks like "UA-XXXXXX-X").
- Set Up the Trigger: In the Triggering section, select All Pages if you want this tag to fire on every page view.

- Save and Publish: Once your tag is set up, click Save. To make it live, click Submit and then Publish in the GTM dashboard.
Step 5: Test and Debug Tags
Before fully launching any tag, it’s crucial to test to ensure it works as expected:
- Click Preview in GTM to activate Debug Mode.

-
Interact with Your Website: Navigate your site in a new tab, and check if the GTM debug console displays the tags firing as you interact with the site.
-
Verify Tag Firing: The debug console will confirm whether the tags are firing properly, which is essential to ensure accurate tracking.
By following these steps, you’ll have GTM fully set up on your website, ready to handle more advanced tracking—like outbound link clicks.
Once GTM is in place, adding new tags and triggers becomes a straightforward process, allowing you to easily track and analyze valuable user interactions without ongoing code changes.
Creating an Outbound Link Click Trigger
With Google Tag Manager set up on your site, the next step is to create a trigger that will capture outbound link clicks.
This trigger is essential for tracking whenever a user clicks on a link that directs them away from your site.
Follow the steps below to set up your outbound link click trigger so you can gain valuable insights into where your visitors are going.
Before you can create a trigger for outbound link clicks, you need to ensure that certain built-in click-related variables are enabled in GTM.
Step 1: Enable Click-Related Variables in GTM
Before setting up the trigger, make sure GTM can recognize clicks by enabling click-related variables.
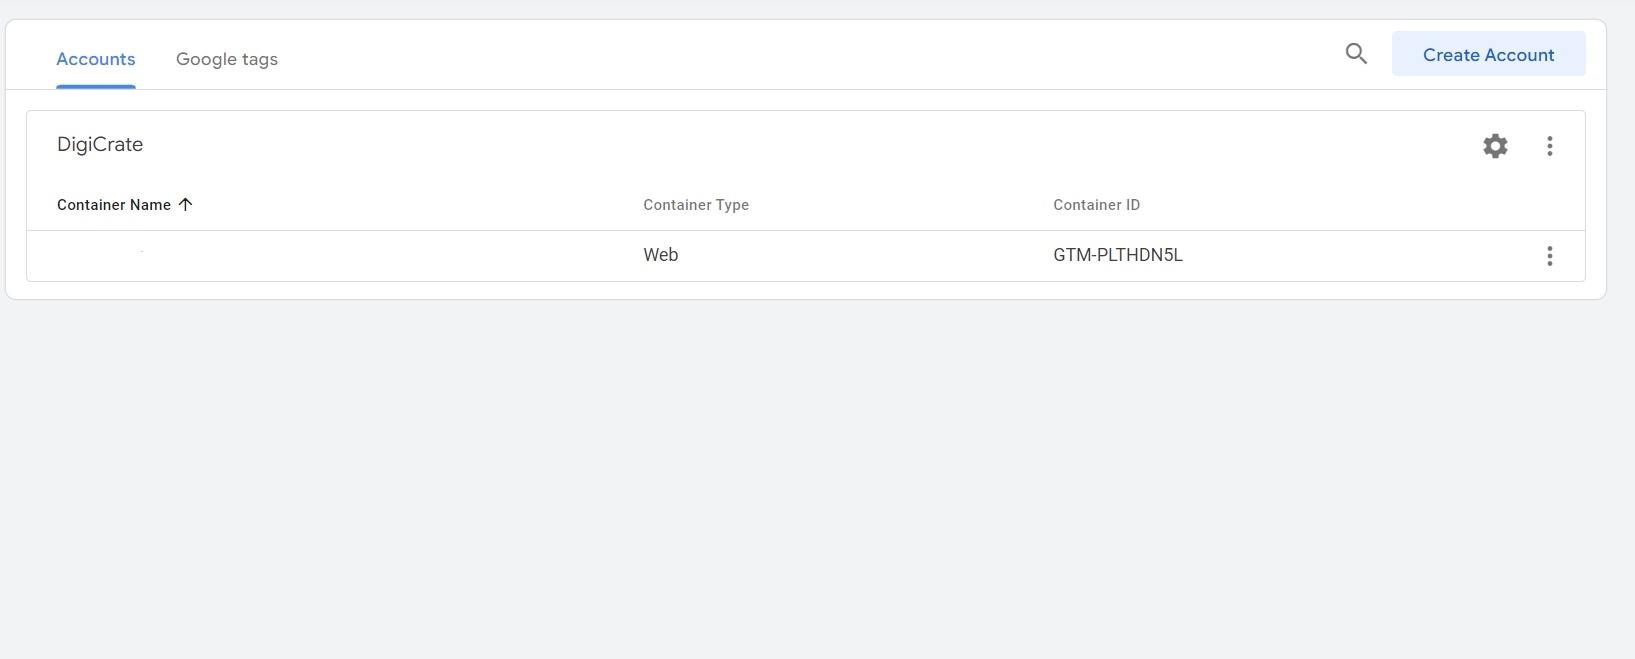
- Open GTM and navigate to your container for the website.
- Go to Variables on the left menu, then click on Configure in the Built-In Variables section.
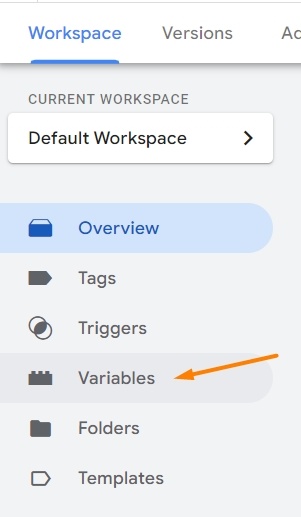

- Enable Click Variables:
- Check the boxes for the following click-related variables:
- Click Element
- Click Classes
- Click Target
- Click Text
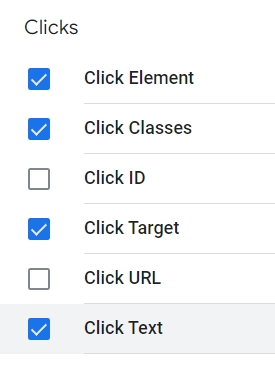
These variables will help GTM recognize and capture details about each outbound link click, such as the URL clicked.
Step 2: Create a New Trigger for Outbound Link Clicks
Now that click variables are enabled, let’s create a trigger specifically for outbound links.
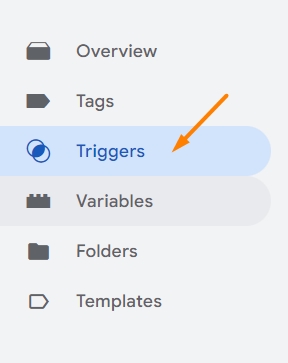
- Go to the Triggers section in GTM and click on New to create a new trigger.

- Name Your Trigger: Use a descriptive name, like “Outbound Link Click,” so it’s easy to find in the future.

- Configure Trigger Type:
- Under Trigger Configuration, choose Click – Just Links. This tells GTM that you want to track link clicks only.
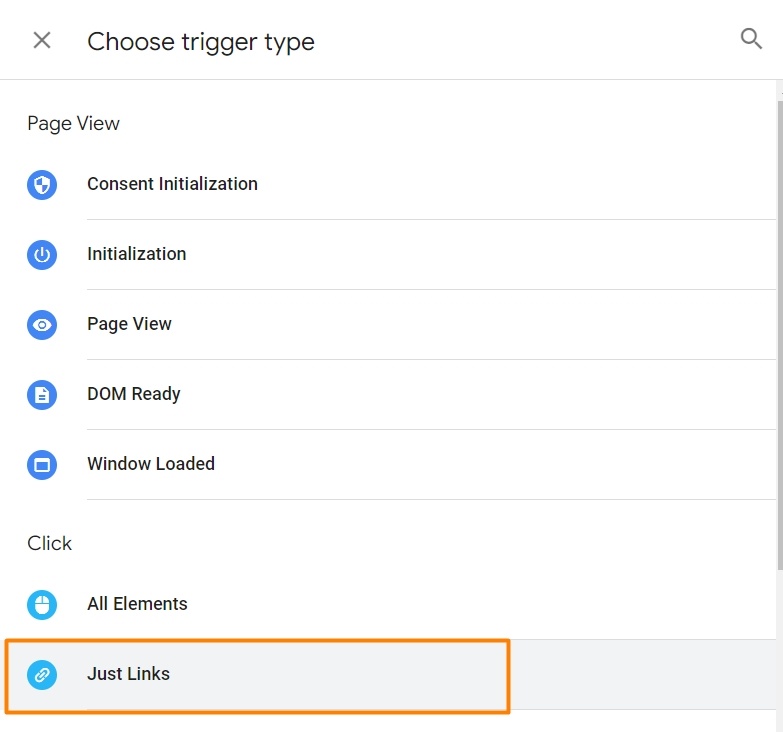
- Set Trigger Conditions:
Select Some Link Clicks to avoid tracking every single link click.
Define the condition that qualifies a link as outbound:
- Choose Click URL from the dropdown.
- Set the operator to does not contain.
- Enter your website’s domain name (e.g.,
yourwebsite.com).
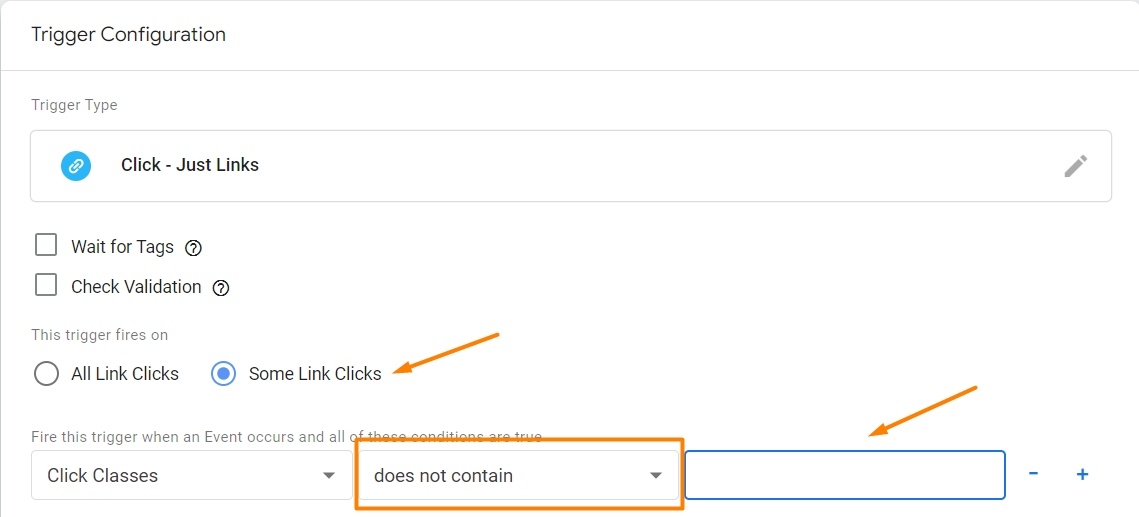
This setup will track only the clicks on links that don’t contain your domain name, meaning they’re outbound.
If your site uses multiple subdomains, you can add additional conditions to exclude those, ensuring GTM tracks only the true outbound links.
Step 3: Test the Outbound Link Trigger
Once the outbound link trigger is set up, it’s crucial to test it to ensure it captures outbound clicks accurately.
-
Activate Preview Mode in GTM by clicking on Preview in the upper-right corner. This opens the GTM debug console.
-
Open your website in a new tab. With Preview Mode enabled, GTM will display a debugging console at the bottom of your site.
-
Click an outbound link—on your site, click an external link to test if GTM recognizes the click.
-
Verify trigger activation—in the GTM debug console, check that the Outbound Link Click trigger fired as expected when you clicked the link. If it’s firing correctly, you’re ready to move on.
With this outbound link click trigger configured and tested, you’re now set to start collecting data on outbound interactions.
This trigger is the foundation for tracking outbound links in Google Tag Manager, allowing you to gain insights into what captures your audience’s attention beyond your site.
In the next step, we’ll cover how to set up a tag to record this data in Google Analytics or another platform.
Creating a Tag to Track Outbound Link Clicks
Step 1: Start a New Tag in GTM
- Go to Tags—in your GTM dashboard, navigate to the Tags section and click on New to create a new tag.

- Name your tag—choose a descriptive name, such as Outbound Link Click – Google Analytics, to easily identify it later.
Step 2: Configure the Tag Type
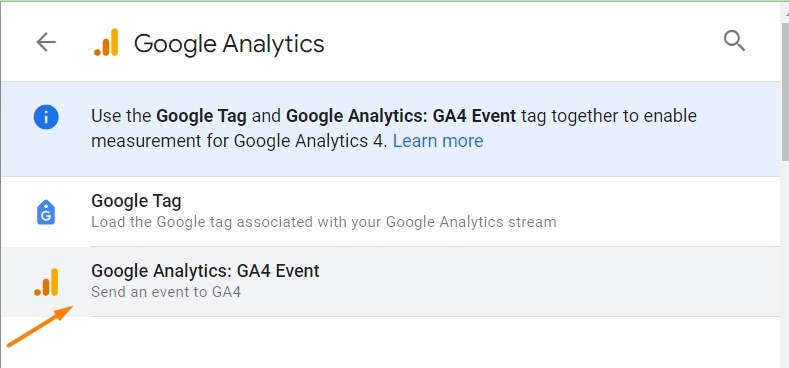
- Choose your tag type—click on Tag Configuration and select GA4 Event.
- Set up tag settings
In the Event Name field, enter outbound_link_click or a name that makes it easy to recognize this event in your reports.
Under Event Parameters, add the following:
-
Parameter name—enter
link_urlto capture the URL clicked. -
Value—select
{{Click URL}}from the drop-down list to dynamically populate the outbound URL in your analytics reports.
These settings allow Google Analytics to capture each outbound link click as an event, giving you a clear view of off-site activity.
Step 3: Attach the Outbound Link Click Trigger
Select the trigger—in the Triggering section, select the outbound link trigger you created earlier.
This links the tag to your outbound link click trigger, so the tag only fires when a user clicks an outbound link.
Step 4: Test the Tag in Preview Mode
Testing your setup ensures that your tag and trigger are functioning correctly:
- Activate Preview Mode—in GTM, click Preview in the upper-right corner to enter Debug Mode.

-
Visit your site—with Debug Mode enabled, open your website in a new tab. Click on an outbound link to see if the tag fires.
-
Verify tag firing—in the GTM debug console, check that the Outbound Link Click tag appears under Tags Fired when you click an outbound link. This confirms the tag is working as expected.
Check the Events section in Google Analytics to verify the tag data is flowing in.
Step 5: Publish the Tag
Once you’ve confirmed the tag works correctly, it’s time to publish it so you can start collecting data.
-
Submit and publish—return to your GTM dashboard, click Submit, and add a descriptive version name, like “Outbound Link Tracking Setup.” Then click Publish to make the tag live.
-
Monitor data in Google Analytics—after publishing, check your Google Analytics reports for the new data. You should start seeing outbound link clicks recorded in your Events, giving you real-time insights into where visitors are going after they leave your site.
With this tag in place, you’ll have a reliable stream of data showing outbound link clicks.
This empowers you to understand which off-site destinations engage your audience most and allows you to refine your content, improve partnerships, and make data-driven decisions.
Deploying and Monitoring the Tag
With your outbound link tracking tag created and tested, the final step is to deploy it live and monitor its performance.
This allows you to start gathering data on outbound link clicks in Google Analytics, helping you analyze user behavior and optimize your content, campaigns, and partnerships effectively.
Step 1: Publish the Tag in GTM
After confirming that the outbound link click tag is working properly, it’s time to deploy it:
-
Submit the tag for publishing—in your Google Tag Manager (GTM) dashboard, click Submit in the upper-right corner.
-
Name the version—add a descriptive version name, like “Outbound Link Tracking Launch.” Including details in the version name makes it easy to track changes in the future.
-
Publish—after naming the version, click Publish to make the tag live on your website.
This process will ensure your tag starts tracking outbound link clicks immediately, capturing valuable insights as visitors interact with links on your site.
Step 2: View Outbound Link Data in Google Analytics
Once the tag is live, you can view outbound link click data in Google Analytics to see how users interact with external links.
- Go to Reports > Engagement > Events to see outbound link clicks tracked under the event name you configured (e.g.,
outbound_link_click). - You can view event parameters such as
link_urlto analyze which URLs receive the most clicks, helping you understand which resources are driving the most interest.
Step 3: Monitor and Analyze Outbound Link Performance
Regularly reviewing your outbound link click data will help you identify patterns and make informed adjustments to your content strategy.
Here are some key areas to monitor:
- Top outbound links—analyze which outbound links receive the most clicks. Are users frequently visiting specific partners, resources, or external sites? Use this data to strengthen those relationships or offer more similar content.
- Traffic patterns by campaign—if you’re running external campaigns, such as sponsored posts or affiliate promotions, track the outbound link clicks associated with these campaigns. This will give you a clear picture of your campaign’s success and help you measure ROI.
- Exit points in the conversion funnel—identify where users click away from your site, especially during crucial moments in your funnel, like before completing a purchase. If you notice a high outbound click rate at these points, consider adjusting your content or calls to action to keep visitors engaged longer.
- Affiliate link optimization—for sites using affiliate links, regularly monitoring outbound link clicks can help you understand which affiliate products or services drive the most interest. This data allows you to focus on promoting high-performing affiliates, optimizing your revenue potential.
Step 4: Fine-Tune Based on Insights
Use the outbound link click data to adjust and optimize your strategies over time:
- Refine your content strategy—if certain outbound links get significant clicks, consider creating more content around those topics to align with your audience’s interests.
- Evaluate partnerships—tracking link clicks provides a concrete way to assess the value of partnerships and affiliate relationships, allowing you to prioritize those that bring the most engagement.
- Improve user experience—if users are frequently leaving your site to visit specific resources, consider embedding more of that information directly on your site to reduce bounce rates and improve user satisfaction.
Advanced Tips and Best Practices for Outbound Link Tracking
Once you’ve set up basic outbound link tracking with Google Tag Manager, you can enhance your tracking setup to gain even deeper insights.
The following advanced tips and best practices will help you customize your tracking, combine data sources, and leverage outbound link insights to make strategic, data-driven decisions.
1. Customize Triggers for Specific Outbound Links
Not all outbound links serve the same purpose, so consider customizing triggers to segment different types of outbound links. Here’s how to do it:
- Affiliate links—if your site has affiliate links, set up a separate trigger to track only those links. This can help you measure affiliate performance individually, providing you with a clear view of the clicks driving revenue.
- Resource links—for content-focused sites, you might want to track links to resources or industry references separately. By segmenting these, you can understand which external resources are most valuable to your audience.
- Partner and sponsorship links—set up triggers to track specific partner links separately, helping you assess the traffic and engagement driven to sponsor or partner sites. This data can be valuable when evaluating partnerships or seeking new sponsors.
By customizing triggers in GTM, you can break down link clicks by category, giving you a clearer view of how different link types perform and contributing to more precise optimization.
2. Combine Outbound Link Data with Other Metrics for Comprehensive Insights
While outbound link clicks provide valuable information on their own, combining this data with other metrics can offer a more comprehensive picture of user behavior.
- Conversion rates—cross-reference outbound clicks with conversion data in Google Analytics to see if specific outbound clicks correlate with conversions. For instance, if users who visit certain partner sites are more likely to convert, consider promoting those partners more prominently.
- User flow analysis—use Google Analytics’ User Flow report to track the path users take through your site before clicking an outbound link. This analysis can help you understand which pages are most likely to send users off-site and adjust your content or calls-to-action (CTAs) to keep visitors engaged.
- Bounce rate by link type—analyze bounce rates for pages with high outbound clicks. If a page’s bounce rate is high, and most users are leaving via an outbound link, consider embedding more on-page content or links to other pages on your site to retain visitors.
Combining outbound link tracking with other engagement and conversion metrics will help you see the full impact of your content and off-site interactions.
3. Use GTM’s Built-in Variables to Capture Additional Click Data
To gain even more granular insights, configure GTM’s built-in variables to capture additional information about each click.
- Capture link text—set up the Click Text variable to track the exact anchor text of each outbound link. This can show which phrases or CTAs resonate most with users.
- Track click classes—the Click Classes variable allows you to capture the CSS classes associated with clicked links, helping you analyze link performance by location or style on your site.
- Identify link position—use the Click Element variable in GTM to gather data on the specific location of outbound links. Understanding if users tend to click links at the top, middle, or bottom of a page can guide your content layout decisions.
These additional variables can give you a richer view of how users engage with outbound links, informing future content structure and CTA placement.
4. Implement Event-Specific Goals in Google Analytics
If you’re using outbound link clicks as a key performance indicator (KPI), set up event-specific goals in Google Analytics to track these interactions more formally.
- Define outbound link click goals—in Google Analytics, go to the Admin section and select Goals. Create a new goal specifically for outbound link clicks, using the event category, action, or label that matches your GTM tag configuration.
- Monitor goal conversions—with goals in place, you can track how often outbound links are clicked and view conversion rates in your reports. This allows you to measure outbound link clicks as part of your site’s overall performance.
- Segment by source/medium—analyzing goal data by traffic source or medium can reveal where visitors who engage with outbound links are coming from, helping you target your outreach or promotions more effectively.
By treating outbound clicks as a goal, you can integrate these interactions into your broader analytics strategy and better measure their contribution to your site’s success.
5. Regularly Test and Update Your Tags and Triggers
Outbound link tracking, like any analytics setup, requires occasional fine-tuning to ensure accuracy and reliability.
- Test tags regularly—use GTM’s Preview Mode periodically to test your outbound link tags and triggers. Ensure they still fire correctly, especially after making updates to your site’s structure or design.
- Refine trigger conditions—if you notice a high volume of misfires (e.g., tags firing on internal links by mistake), adjust your trigger conditions to refine which clicks qualify as outbound.
- Stay updated on GTM and Google Analytics changes—Google Tag Manager and Google Analytics frequently update their features and capabilities. Keeping your setup current will help you make the most of new functions and ensure continued data accuracy.
Frequently Asked Questions
Why is tracking outbound links important?
Tracking outbound links reveals where your visitors go after leaving your site, offering insights into their interests and behaviors.
How can I track outbound links with Google Tag Manager?
Set up Google Tag Manager, create a trigger for outbound link clicks, and then create a tag to record outbound link data in Google Analytics.
What benefits does Google Tag Manager offer for tracking outbound links?
Google Tag Manager enables efficient tracking of outbound links without the need for constant code changes.
How do I create a trigger to track outbound link clicks with Google Tag Manager?
Enable click-related variables, set up a trigger to track all outbound links, and define conditions to identify outbound links.
How do I test if the outbound link click trigger is working in Google Tag Manager?
Activate Preview Mode, click on an outbound link on your site, and verify if the trigger fires in the GTM debug console.
To Conclude
Tracking outbound links with Google Tag Manager provides essential insights into how users engage with external content, partners, and resources.
By setting up and refining your tracking, you can make informed decisions to optimize your content, boost affiliate and partnership performance, and better understand your audience’s interests.
Start tracking outbound links today to unlock valuable data and drive your website strategy forward.


